Back to Asset Essentials Main Menu
Custom fields
Custom Fields allow you to create new types of data that can be stored about various categories in Asset Essentials.
How to add a custom field
*Note: You can create a maximum of 50 custom fields for any data type. A deleted custom field cannot be used again.- Click on the Admin menu icon, then click on Configurations.
- Select Custom Fields from the Misc section.
- Click the New button.
- Select the appropriate data Type from the drop down menu. *Note: When creating a custom field, it is important that the field be applicable to most of the records that will be created for this data type. For example, you should only add Room Number for the Work Order type if you are able to fill in this information for most of your Work Order records.
- Enter the Name for the custom field.
- Select a Category for this custom field to display on. For example, if you select the Electrical category, the custom category will display when adding an Electrical work order.
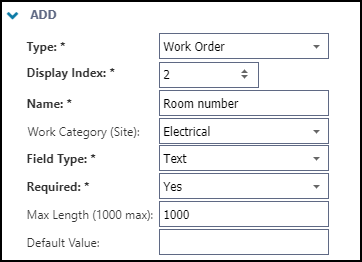
- Select a Field Type. This will determine how a user can enter data for this custom field.
- Text: This option will display a text field.
- Enter a Max Length to limit the number of characters when entering the value.
- If you want the field to automatically populate with a value, enter a Default Value.
- Number: This option will display a field that accepts only numerical values.
- Enter a Min Value and Max Value to limit the value that can be entered in this field.
Enter a Display Format to determine the number of decimal places you would like Asset Essentials to display for your custom field. For example, if you would like one decimal place to show, enter 0.0. For two decimal places, enter .
- If you want the field to automatically populate with a value, enter a Default Value.

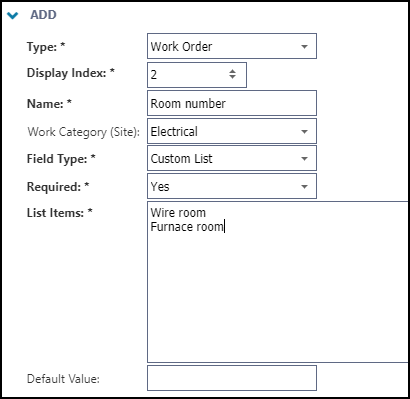
- Custom List: This option will display a list of options in a drop-down menu.
- Enter each option that should display in the drop-down menu in the List Items field. Press 'Enter' on your keyboard after each item to ensure that each option is on its own line.
- If you want the field to automatically populate with a value, enter a Default Value.
- Date/Time: This option will display a field that allows you to enter a date and time.
- Enter a Display Format to determine how the date and time will display.
- If you want the field to automatically populate with a value, enter a Default Value.

- Text: This option will display a text field.
- Decide whether or not this custom field should be Required.
- Use the Availability section to determine which Sites have access to this custom field.

- Click the Save button at the top of your screen to add this custom field to Asset Essentials.
Adding a custom field to a template
Once a custom field has been added to Asset Essentials, you can apply the field to a template, such as a Work Order Template, to ensure the field displays on the appropriate records. *Note: If a Category was selected for the Custom Field Type, this custom field may already display on records for the selected Category.
- Click on the Admin menu icon, then click on Configurations.
- Select the applicable option in the Template section, such as Work Order Templates.
- Select a template from the list that displays.
- In the Custom Fields section, check the box beside any custom field that should display when this template is used.
- Click Save.

